今回、SSLの証明書はValueSSLという会社が提供するCOMODO社のポジティブSSL マルチドメインというものを使いました。以下、手順をメモしておきます。
私の環境は、
CentOS 7.4
Apache 2.4.6
OpenSSL 1.0.2k-fips
です。
(以下、.keyファイルの作成方法は省略しています。)
1. opensslでマルチドメイン証明書用のCSRを作成
以下は https://rms-digicert.ne.jp/howto/csr/openssl.html の記述の引用です。
/etc/pki/tls/openssl.cnfの[req]セクションで
[req]
req_extensions = v3_req
上記記述がコメントアウトされている場合は、有効にします。 記述がない場合は上記を追加してください。
[ v3_req ]セクションで
[ v3_req ]
basicConstraints = CA:FALSE
keyUsage = nonRepudiation, digitalSignature, keyEncipherment
上記に続けて以下を追加してください。
subjectAltName = @alt_names
[alt_names]
DNS.1 = foo.com
DNS.2 = www.foo.org
上記は、Subject Alternative Names(サブジェクトの別名)に foo.com と www.foo.org を登録する例です。
DNS.1 =、DNS.2 = .. に続けて、Subject Alternative Names(サブジェクトの別名)に登録するホスト名を記載してください。
以下のコマンドで /etc/ssl/san_openssl.cnf を使ってコモンネーム www.foo.com の CSR を作成します。
openssl req -key yourkey.key -config /etc/ssl/san_openssl.cnf -new
この後は通常の openssl コマンドと同様に、対話的にデータを入力します。コモンネーム www.foo.com も入力します。
作成できた CSR は以下のコマンドで内容を確認できます。$CSR_FILENAME は内容を確認する CSR ファイルの名称です。
openssl req -text -noout -in $CSR_FILENAME
以下の様な内容が表示されるはずです。
Attributes:
Requested Extensions:
X509v3 Basic Constraints:
CA:FALSE
X509v3 Key Usage:
Digital Signature, Non Repudiation, Key Encipherment
X509v3 Subject Alternative Name:
DNS:www.foo.com, DNS:foo.com, DNS:www.foo.org
2.ValueSSL社のサイトで、ポシティブSSL マルチドメインを申し込み。その際に1.で作成したCSRの内容を貼り付けます。
3.SSL証明書の取得には、申し込んだドメインの正式な所有者であることを証明するため、そのドメインでのメールアドレス(ValueSSL社が何パターンか出してくる中から選ぶ)でメールを受信してその中にあるリンクをクリックして手続きする必要があります。(私が使っているvaluesslというサービスではメール認証が面倒な時には、ファイル認証もサポートしています。この方法はサービス会社が指定する内容のファイルを、サイトの特定のディレクトリーに置いて、サービス会社のクローラーがアクセスして読んで内容が一致すればOKというものです。)このため、
(1)DNSサーバーの設定でMXレコードを設定し、普段メールで使っているドメインでそのドメインのメールが受信できるようにします。
(2)/etc/postfix/virtual を編集し、以下を追加。
shochian2.com anything
admin@shochian2.com t-maru
max-weber.jp anything
administrator@max-weber.jp t-maru
この際に、/etc/alias に別の転送設定が指定されていないか注意します。
4.3.でメールを受信して手続きすると、1時間くらいで(私の場合作業したのが夜でイギリスのCOMODO社はたまたま営業時間内だったのでしょう)COMODO社から直接英語のメールで4つのcrtファイルが来ますが(本サイト1+バーチャルドメイン2の場合)、これは無視して何もしません。(私は最初この4つのcrtファイルをインストールしようとしてはまり、apacheが再起動しなくなってトラブリました。)
5.次の日くらいにValueSSL社から、メールでサーバー証明書1つと中間CA証明書1つがメール中に記載された形で来るので、それぞれを切り出して、.crt、.caファイルを作成します。
6./etc/httpd/conf.d/ssl.conf を編集して以下を書き換え+追加。(その前に、.key、.cer、.caファイルは、オーナーをroot、ファイル属性を400に変更しておきます。)
# Server Certificate:
# Point SSLCertificateFile at a PEM encoded certificate. If
# the certificate is encrypted, then you will be prompted for a
# pass phrase. Note that a kill -HUP will prompt again. A new
# certificate can be generated using the genkey(1) command.
SSLCertificateFile /etc/pki/tls/certs/shochian2.crt
# Server Private Key:
# If the key is not combined with the certificate, use this
# directive to point at the key file. Keep in mind that if
# you’ve both a RSA and a DSA private key you can configure
# both in parallel (to also allow the use of DSA ciphers, etc.)
SSLCertificateKeyFile /etc/pki/tls/private/shochian2.key
# Server Certificate Chain:
# Point SSLCertificateChainFile at a file containing the
# concatenation of PEM encoded CA certificates which form the
# certificate chain for the server certificate. Alternatively
# the referenced file can be the same as SSLCertificateFile
# when the CA certificates are directly appended to the server
# certificate for convinience.
SSLCertificateChainFile /etc/pki/tls/certs/shochian2.ca
#以下はファイルの末尾に記載追加。
#文字コードの指定は私の環境ではEUC-JPとUTF-8のドメインが混在していて文字化けが発生したため入れたもの。
NameVirtualHost *:443
<VirtualHost *:443>
DocumentRoot /var/www/wordpress
ServerName shochian2.com
SSLEngine on
SSLProtocol all
SSLCertificateFile /etc/pki/tls/certs/shochian2.crt
SSLCertificateKeyFile /etc/pki/tls/private/shochian2.key
SSLCertificateChainFile /etc/pki/tls/certs/shochian2.ca
<Directory “/var/www/wordpress/”>
</Directory>
# ErrorLog /var/www/domain1/logs/error_log
</VirtualHost>
<VirtualHost *:443>
DocumentRoot /var/www/html
ServerName shochian.com
SSLEngine on
SSLProtocol all
SSLCertificateFile /etc/pki/tls/certs/shochian2.crt
SSLCertificateKeyFile /etc/pki/tls/private/shochian2.key
SSLCertificateChainFile /etc/pki/tls/certs/shochian2.ca
<Directory “/var/www/html/”>
</Directory>
# ErrorLog /var/www/domain2/logs/error_log
</VirtualHost>
<VirtualHost *:443>
DocumentRoot /var/www/maxweber
ServerName max-weber.jp
SSLEngine on
SSLProtocol all
SSLCertificateFile /etc/pki/tls/certs/shochian2.crt
SSLCertificateKeyFile /etc/pki/tls/private/shochian2.key
SSLCertificateChainFile /etc/pki/tls/certs/shochian2.ca
AddDefaultCharset UTF-8
AddCharset UTF-8 .cgi .htm .html .pl
<Directory “/var/www/maxweber/”>
</Directory>
# ErrorLog /var/www/domain3/logs/error_log
</VirtualHost>
注:ValueSSL社のサイトにあった説明では<VirtualHost *:443>の*の所に具体的IPアドレスが記載されていましたが、その記述ではバーチャルドメインが機能しなかったので修正しました。
7.systemctl restart httpd.serviceでapacheを再起動します。
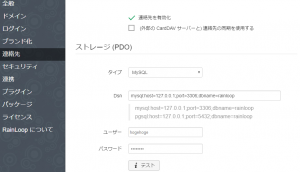
 RainLoopは驚くべき事に初期状態ではアドレス帳がありませんでした。
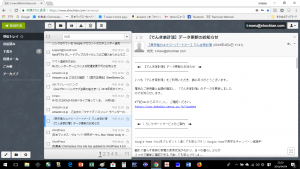 自宅サーバーでのWebメールは、昔Squirrel Mailというのを使っていましたが、サーバーを更新して入れ直した時にいつからか文字化けが発生して使えなくなりました。それ以来Webメールは設定していませんでしたが、今回ググってみてRainLoopというWebメールを入れてみました。インストールは非常に簡単でした。しかし、管理画面には問題なくログインできましたが、そこでドメインを設定して、ユーザー名でログインしようとすると認証エラーでダメです。しかし、10回くらい繰り返してやっていたら、そのうちログイン出来るようになりました。しかし、次の問題は、メール受信はOKですが、送信がやはり認証エラーになりました。あれこれやって、結局ドメインのSMTPの設定で、”php mail() 関数を使用する” にしたら送信できるようになりました。



 現在私の自宅サーバーでは1台で2つのドメインを管理していますが、そこに更に1つ付け加わることになりました。それもあって、SSLの正式な導入を決めました。